Art journal 10-13 and a Blog break

Hi everyone,

As you’ve noticed it’s been quiet around here lately…

I have been very busy the last few weeks and, unfortunately, I didn’t have any inspiration to make and create new things. I hope to be back soon, but for now I’ve decided to take a break from blogging for a while. Knowing myself, I will be back :). However, my posts will probably appear less frequently, since I find that I have less time to create… Besides, I always feel that my posts should have some ‘new’-value: some topics you can find anywhere on the internet, so there’s no point in repeating that. But that is just my opinion ;). What do you think?

By the way, I will not continue to automatically feature my posts on facebook, so if you want to keep track of what I am up to: please sign up to follow my blog via email! You will get a notification every time I write a new blog post!! You can sign up on my homepage, clicking the button on the right. You can undo that anytime you like, so no worries! Or, you could just check in every now and then ;).

For today I want to show you my art journal pages 10 to 13, though! Everyone likes to see pictures, right?

Here they come:

'But how to find you' - Acrylic paint and handmade stencils

‘But how to find you’ – Acrylic paint and handmade stencils

'Just stamping around' - Acrylic paint, pen and ink, handmade lino- foam and rubber stamps.

‘Just stamping around’ – Acrylic paint, pen and ink, handmade lino- foam and rubber stamps.

This is me :) Acrylic paint and on the right page image transfer of a print using Art Medium (Schjerning)

This is me 🙂 Acrylic paint and on the right page image transfer of a print using Art Medium (Schjerning)

'Girl in the bubble' - Acrylic paint and Posca markers. Stamping with acrylic paint on bubble wrap ;)

‘Girl in the bubble’ – Acrylic paint and Posca markers. Stamping with acrylic paint on bubble wrap 😉

I have been working on a small mixed media canvas recently! My first ever! I still have to take pictures of it now that it is finished, in daylight as I’ve promised. So come back later to see the results.

I guess every blogger has the issue of having a ‘writer’s block’ every once in a while, but as I’ve told you before: I don’t ever want to feel like I háve to write a blog every week or so. So, to stick to my 2014 resolutions: I will take and make more me-time! Sorry about that 😉

Hope to see you soon though, and keep making time to do something fun every day!!!!

Veerle ondertekening

Art Journal pages 6-9

Hi everybody,

Back again this week with some more art journal pages! I’ve been trying out some materials in different layouts, to find out which ones I like to use in my journal and here’s what I came up with!

Page 6. "Loneliness" (Acrylics, watersoluble graphite and Posca markers).

Page 6. “Loneliness” (Acrylics, water-soluble graphite and Posca markers).

For page 6 I’ve tried my new Koh-I-Noor water-soluble graphite pencils (also for the pages 3 and 4)! I drew this face after a photo. Just practicing my portrait drawing for this page. Unfortunately, my journal book is made of thick craft paper, which is actually perfect for acrylics and collage, but not quite suitable for using water colours: the paper doesn’t take up the water. (My next journal may just be a handmade book consisting of mixed-media paper or cold-pressed water colour paper ;).) For now, I simply drew the face with my water-soluble pencils in a 180 g grained paper sketch book and cut it out. If you don’t like your drawings, or just don’t have inspiration or time, you could just as well cut up a magazine or photos and make a collage. Then, I used my favorite multi-purpose (Scherning) Art Medium to stick my drawing to the page. It’s a glue, waterproof (though sticky) ‘varnish’ and paint medium all-in-one (comparable to gel medium etc.) so I use tons of it!!  Then, add some acrylics (which will stick to the art medium very well) to hide the shine and glossy effect of the art medium and to paint the hair. I’ve used a white Uni Posca marker to add some text, which I erased a bit for the blog images… Sorry about that ;)! I told you I never use Photoshop to spruce up my images just for the visual effect, although for my art journal pages I do use editing software to hide my personal writings. Anyway, imagine some white text on the left page ;).

And here’s page 7! Remember the DIY eraser stamps I wrote about a few weeks ago? Then you have probably seen the right page of this one before. For this page I wanted to try my hand-carved peacock feather stamp and one of my doll-stamps.

art journal pagina 7

Page 7 “Mantra for the gifted” (Acrylics, hand-carved stamps and Stazon ink, blending chalks, Posca markers)

For page 7 I felt like painting a bee (yes, it is supposed to look like a bee but it could just as well be a wasp, hahah). So, that’s what I did. I’ve stamped some stars as well; with a stamp I bought in the store. The rest of the background was painted with acrylics, using my favorite and least expensive tool: my fingers! Then, I stamped a few dolls on 180 gr grained paper and stained them with blending chalks, for a light pastel colour. I cut out the dolls and glued them to the page. Then stamped around with my peacock feather stamp. I’ve used water-colour pencils to add a bit more colour to the feathers. Surprise surprise: the Posca marker again for some text (which I erased. Again).

Here’s page 8! I felt like making a doodle brain. Or zentangle, if you like 🙂

Page 8 "Doodle brain"(Acrylics and Posca marker)

For this one I actually took one of my human anatomy books as an example for the brain. I painted the shape with acrylics first and divided it into small areas with my Posca marker. Smaller areas are easier to fill up with different doodle patterns. Well, easier in the sense that with smaller areas I don’t feel anxious about starting to doodle and mess up my page ;).

And the last one for today, page 9, was inspired by my dear cats! For your information, this is one of the pages I don’t like that much, though I enjoyed the way I created it: painting with coffee!!

Page 9 "cats love me anyway" (Acrylics, coffee, soft pastels, hand-carved stamp, stazon ink and Posca marker)

Page 9 “cats love me anyway” (Acrylics, coffee, soft pastels, hand-carved stamp, Stazon ink, water-soluble wax crayons and Posca marker)

I painted my cat Punky with coffee on my thicker grained paper. So don’t throw away cold/too-strong/leftover coffee! Just take a brush and start practicing watercolouring ;)! The image may look familiar, because I used the same photo as an example for the coffee painting as for a drawing I showed 9 months ago. I’ve struggled with this page. It didn’t turn out the way I wanted and by adding more lines, colour and details I think I just made it worse. In the end, I did like the idea of painting with coffee, adding doodles on the page and using my sepia soft pastels to blend the glued drawing with the rest of the page. Though maybe this was not the most artsy day for me. Still happy with it though!

Please leave a comment for I would love to hear your thoughts!

Happy crafting this week!

Veerle ondertekening

Art journal pages 1 – 5

Still keeping up with my resolutions for 2014! Because I felt the most important of all was to take (make) more ‘me-time’, you will notice that I am writing posts on my blog less frequently :(. But, since this blog was never intended to be ‘a-post-a-day-blog’, I refuse to feel bad about myself for being busy and making choices. Sorry about that, though ;).

Anyway, I have been art journaling a lot: my new obsession, as you must have figured out by now… I’ve noticed that every few months or so I get this new obsession about something. Whether it’s painting furniture, crochet, embroidery, or in this case painting and drawing!

To inspire you to give it a try, I wanted to show you my first 5 art journal pages. EVER! Lot’s of images, little text again. There’s no need for text ;). Here they are!

"Create your own world"

Page 1. “Create your own world” (Acrylics, collage, stamps and Uni Posca markers)

"Spend your time with the ones who are worth it"

Page 2. “Spend your time with the ones who are worth it” (Acrylics and stamping with acrylics, collage and Uni Posca markers).

"Dream. Just to dream. Period"

Page 3. “Dream. Just to dream. Period” (Acrylics, watercolour graphite and collage, Uni Posca markers, my hand-made stencils and paper napkins).

"Behind the wall"

Page 4. “Behind the wall” (Acrylics, DIY stamps, craft paper, collage, watercolour graphite, stencils with thick gesso, Posca)

"What inspiration feels like"

Page 5. “What inspiration feels like” (Acrylics, collage with craft paper, Posca markers and stamping with bubble wrap)

I have to admit, I’m not the best at drawing and painting portraits ;). I promise, they get better! Anyway, I refuse to nót paint faces, since I want to get better at it. I just hope that practice makes them better. However, because it’s my art journal, I can make mistakes and paint whatever I want! It doesn’t have to be perfect and it doesn’t have to be beautiful. It just has to be fun to make and to make me relax and spend my me-time on something I enjoy doing. I can tell you, it’s working ;).

If you want to start your own art journal but don’t know where to begin, you should really check out the Art journalist website. There is a group you can join on Facebook or follow by e-mail (I think), which will provide you with a journal prompt every week. It’s a 52 weeks long journal workshop!!! And it’s all free, hooray!! Go and have a look!

Happy creating this week!


Veerle ondertekening

DIY eraser stamps

Last week I wrote down some thoughts about art journaling and I have to say, I totally love it!! It’s perfect for someone who, like me, would like to journal but never gets the words down right. And, don’t forget, you don’t have to be an artist to art journal! Unfortunately, art supplies tend to be somewhat expensive. The bright side is: if you have patience and take a bit more time, some things can be done the cheaper way. Also, if you like to use stencils and stamps (for example for a background, or to add detail to your pages), sometimes it’s really hard to find the perfect image. You may be spending hours or days looking for the right stamp… So, to start with, here are some examples of how to make your own stamps from erasers!

When I was younger, big erasers were sold anywhere, but at the moment they are really hard to find in stores here in the Netherlands… So, still looking for a bigger size… Anyway, my sister got me a lino-cutting tool for Christmas, which came with various knives. She got me two big erasers as well, which were sold in the same crafting store (apparently…). I really should ask here where she bought them, so I can get some more. Because: making stamps is addictive!!! For now, I started with the two erasers she gave me and a few smaller ones I bought myself.

The supplies you’ll need: a pencil, some erasers (I prefer the cheap, plastic stiff ones. Carving details in soft erasers is very hard because small edges will bend and break easily!) and a tool for lino-cutting.

supplies

Start by drawing a design on your eraser, with a pencil or a pen. You could draw your own design or trace one with carbon paper. I drew mine myself, though I did use photos of peacock feathers for inspiration for the feather stamp.. Below you can see two finished stamps and the ones I still had to carve…

butterfly and girl stamp

Then, decide which parts you want to carve. Do you want a positive or a negative image? So, either carve everything except your drawing, or just the lines of the drawing and leave the rest…

Start carving 🙂

This one says ‘Handmade’:

IMGP0481

carving stamps1

Once your done, try your stamp on a piece of paper. If you’re not satisfied with the look yet, you can do a bit more carving for a finishing touch.

If you are happy with the result, stamp your image on a piece of thick paper, wood or cardboard.

stamp on thick paperHere you see I made some background stamps, for example the coffee stain and the bricks. I could use the leaves, owl, little girl and butterfly for detailing as well.

Then cut out the thick paper to the size of your stamp (eraser). Use Art medium or mod podge to adhere the paper to the backside, so you will know what image the stamp will make. Make sure to glue it the way the image will look when putting the stamp down on paper (so don’t put it upside down or something 😉 )

glue paper to stampBy gluing the image to the eraser with art medium/mod podge, you will be able to wash off stamping ink (only if it’s water soluble ink of course) or acrylic paint after stamping, without blurring the ink on the example on top.

peacock stamp2

That’s it! You can go crazy now with stamping anything!! 😉

Here I used my own ‘handmade’ stamp to make labels for my handmade gifts!

handmade labelsI stained the edges of the labels with Stazon ink.

And here is an example of the peacock feather in one of my Art Journal pages. There is white text in the page, but I erased it a bit… That’s kind of personal 😉 Still a journal you know 😛

You can use blending chalks (powder chalks), watercolor pencils or anything you like, to add color to your stamps.

peacock stamp

art journal page 6

Have fun making your own stamps!!!

I am starting on making stencils as well, so probably in a few weeks or so, you will find some examples of that 🙂

Happy crafting!

Veerle ondertekening


Some personal thoughts about Art Journaling…

Although you will probably expect another furniture makeover or crochet project today, the last few weeks have been all about some artsy stuff for me. No pictures today! Just some personal thoughts, though you may not be used to that on this blog… Since I am right in the middle of some inspirational period (there’s no other way I can describe it) I am working on like ten projects at a time at the moment, without finishing any of them. Inside my head it’s a lovely messy twirl of inspiration and ideas and I am trying to figure out how to use this inspiration on new projects… I have been mostly drawing, painting and trying out a few new materials the last few weeks… Because, put simply, what I’ve done up till now was not creative enough to me. Call me a perfectionist or ‘too hard on myself’ but being creative means, to me, creating something NEW (and not copying others). Every time I actually create something my very own, gives me this great sense of accomplishment and satisfaction, and that feeling is very addictive for me ;).

Up till now, I have been mostly using or combining other people’s ideas or techniques in a way that was not completely new. For every one of my projects I can totally see where I got my inspiration and ideas from. Of course that’s a good thing in a way, because we all need inspiration to get started with new things. Also, you don’t need to come up with new techniques that have already been used before, although occasionally you will by accident… Although I really enjoy working on all of my projects and learn new techniques every time, I still have this feeling that nothing I made is really, really mine, that I had not really used my creativity and make something completely ‘me’, using my emotions and letting go of my fears. The last few months I’ve been drawing a lot and it was driving me mad that I couldn’t come up with something that actually looked good enough to me. Trying to be creative while having high expectations and your head telling you it has to be perfect the first time, well, it kills creativity. With every ten to twenty sketches you will probably find only one good idea, but patience and ‘keep on trying’ wasn’t enough. I felt the need of something to keep my ideas and thoughts together and keep track of my (creative) journey in a book. Try to express my feelings creatively and trying to let go of expectations of what ‘art’ or designs should look like. Call it a journal, diary or portfolio if you will, but it should be something where I can draw and try things that are mine, that I actually can enjoy making, without feeling bad about myself because it doesn’t look perfect enough. Apparently it has a name: it is called Art Journaling and I totally love it!!! Look it up, it’s great!!!

To me, an art journal is a creative diary, which is all about expressing my feelings in a creative way, letting go of perfectionism and most importantly: to have fun making it. I had completely forgotten about how good I feel when I get to draw or paint (without expectations, that’s to say). To give the creativity and inspiration a boost, I have started an art journal a few weeks ago. To make a fresh start in 2014 😉 I don’t know if I will show you just yet, but as most things I do end up here on my blog, I probably will 🙂 ….

By the way, if you go looking for art journaling examples on pinterest, google, youtube, whichever you use, try not to be overwhelmed by some of the ‘perfect’ and beautiful pages that you see. Tell yourself that most people tend to just show whatever art journal look good, and feel ashamed of what doesn’t and you will never see those (ten times as many) pages. So, keep in mind that you will probably find very little not-so-perfect pages (I specifically don’t use the word ‘ugly’, because 1. it is a matter of taste, and 2. there’s no such thing as ugly art journals: art should personal and as long as it has it’s purpose it’s just art. Although some pieces could be perfected in a way that it shows the ideas behind it in a better way (or techniques, of course), and the art will either speak to you or it won’t.). Don’t let what you see hold you back from starting your own art journal. Feel inspired, try out some techniques and media and decide which ones yóu like, yóu want to use and find your own style in a playful way. Go with the creative flow and see what comes out of it!

Once you’ve looked it up and want to give it a try, read this:

You don’t have to buy all the expensive materials you see others using right now, to start your art journal. Use whatever you have and buy something you really want one or two pieces at a time. Start by using a pen, a pencil, some acrylic paint, watercolours, pastels, whatever you already have and you like working with. Use plain paper to start with, or some scrap papers or packaging materials to draw on. However, you will find that there are some essential materials, depending on your materials of choice. For example, if you want to work with wet media, like watercolour or acrylics with a lot of paint, it will require thicker paper, whereas when you are drawing, you could use almost any paper you have, to start with that’s to say…

As you probably know, art supplies can be very expensive, depending on the technique you are using and, needless to say, the quality. However, some things can be done in a cheap way! I think I will  show you how I’ve made my own stamps and how you don’t need stamping ink per se but use acrylic paint instead, later this week. So, come back later this week if you want to see those.

Some random ideas I’m working on at the moment (just a teaser ;), so let me know whichever you want to know more about so I know which projects to blog about): I am crocheting a swirl ribbed hat for a friend (trying to figure out a pattern of my own), at the same time working on a recipe for all-natural PERFECT home-made deodorant, art journaling, making DIY stamps, trying out linocuts, cutting my own stencils and I am doing a makeover for one of our wooden crates, for storing all of my ‘TOYS’ (my electric tools 😉 lol) using stencils and text.

Hope you can feel my inspiration over there while reading this!!

See you soon,

Veerle ondertekening


DIY leather organizer for crochet hooks or knitting needles

Back in 2014, wishing you all lots of creativity, inspiration and health for this fresh year!!

I hope you all have made big plans and (realistic) resolutions for this year ;). I know I have!

Today I want to share an easy way to make a roll-up-organizer for all those crochet or knitting needles. Any of you yarn-lovers know what it’s like? Working on your pieces a little bit every day, ending up with yarn and needles all over the place because it takes either too much effort to put them away or because you don’t have anything to put them in anyway?? I thought it was time to make an organizer which is easily accessible (because of the effort part) ánd looks good. Because I always want to try new thing, this opportunity was the perfect time to try out leather burning.

Allereerst allemaal een creatief, inspirerend en gezond 2014 gewenst! Ik hoop dat iedereen grootse plannen en (realistische) goede voornemens heeft gemaakt voor het nieuwe jaar ;). Ik in ieder geval wel!

Voor vandaag wil ik een idee laten zien om zelf een heel gemakkelijk, oprolbaar haak-/breinaalden opbergmapje te maken. Een aantal haak- en breiliefhebbers zullen het misschien wel herkennen: elke dag een klein stukje aan een project werken en vervolgens overal naalden en wol hebben liggen, omdat het óf teveel moeite is om het op te ruimen, óf omdat je überhaupt niks hebt om de boel in op te bergen? Ik vond dat het tijd werd om een naalden opbergmap te maken die én handig is en waar ik snel bij kan, én er leuk uit ziet. Omdat ik altijd nieuwe dingen wil uitproberen heb ik deze gelegenheid gebruikt om leer-branden uit te proberen…

What you’ll need: (Benodigdheden:)

  • A big piece of leather een groot stuk leer
  • A crafting knife and a cutting board een hobbymes/stanleymes en een snijmat/-plank
  • Something to punch holes Iets om gaatjes mee te maken, bijv. een gaatjestang
  • Scissors and a ruler Een schaar en liniaal
  • A large button een grote knoop
  • A piece of string een stuk touw.

supplies needle storage

Start by cutting a big rectangular-shaped piece of leather, which is large enough to hold all your needles. Put them all on the piece of leather and make sure to leave some excess in case you may have to add a few more needles in the future… Then cut it as straight as possible.

Knip een rechthoekig stuk leer uit, dat groot genoeg is om al je naalden in te bewaren. Leg al je naalden hiervoor op het leer en zorg voor een extra stuk voor het geval je later nog meer naalden gaat toevoegen. Knip het vervolgens zo recht mogelijk uit.

cut leather with a knifeThen, define which side of the leather will be the outside. Put that side facing down onto your cutting board. Take your crafting knife and make two straight cuts, right above each other, for each hook. You can see my first three sets of cuts in the picture above. Try whether the needles fit in. Cut them a bit wider if you have larger hook handles, like the orange one in the picture above, or for needle sizes over 10mm for example… Make as many cuts as you want, but make sure that there’s enough space in between every needle, to keep the leather from tearing out. In the picture below you can see what it looks like on the outside:

Bepaal welke kant van het leer je aan de buitenkant wil hebben en leg het leer met die kant naar beneden op de snijmat. Gebruik een hobby-/stanleymes om twee rechte snedes te maken, recht boven elkaar, en dat voor elke naald. De snedes voor de eerste drie naalden zie je hierboven op de foto. Maak de snedes iets groter voor ergonomische haaknaalden (de oranje naald hierboven) of voor naalden met een grotere diameter… Maak zoveel snedes als je wil, maar zorg dat er in elk geval tussen elke naald genoeg ruimte over is, zodat het leer niet uit kan scheuren. Hieronder zie je hoe het er aan de buitenkant dan uitziet.

backside cut leather

Take you hole punching tool and punch two holes on one end of the leather. This is where you will attach the button and string. You will have to make sure the button is on the outside of the leather. So the right side, which is facing outwards when you roll up the leather. I didn’t attach the button permanently, but you could if you want of course. Or you could use snaps.

Maak twee gaten aan één uitende van het leer, waar je de knoop met het touw later doorheen rijgt. Zorg dan wel dat de knoop aan de goede kant van het leer zit, dus de buitenkant als je het leer hebt opgerold. Ik heb de knoop niet vastgezet (alleen het touw er doorheen geregen) maar dat kan natuurlijk ook. Of je kan drukknopen gebruiken.

punch holes

attach button and string

Then came the fun part: adding details by burning the leather! I took out all the needles and took off the button and rolled out the leather. Then I drew on some letters to burn with my soldering tool. Which is not the appropriate tool of course 😉 I know, but if you remember to use one soldering point for burning leather and don’t use it for soldering later, it’s okay. I chose a very easy design, using some stencils I had lying around, spelling HOOKED. It was just for practice. Pick a more complicated design or perhaps your own name, for a less cliche look 😉

En dan het leuke gedeelte: het branden van het leer. Haal alle naalden uit de sleuven en haal de knoop er af. Rol vervolgens het leer uit en teken je design. Ik heb met sjablonen HOOKED getekend, gewoon omdat ik eens wilde oefenen. Maar je kan natuurlijk een iets minder cliché ontwerp gebruiken, bijvoorbeeld een groter en ingewikkelder sjabloon of je naam. Ik heb het leer gebrand met een soldeerbout, wat natuurlijk niet echt het geschikte gereedschap is voor leer branden. Maar als je dezelfde soldeertip maar niet gebruikt voor solderen is het prima. Er blijft namelijk residu achter op de punt en dat gaat ten koste van de soldeerkwaliteit…

burn your design

finished burned designI didn’t particularly like the completely filled letters, but I just wanted to try it out so I can live with that 😉

Ik vond de helemaal gevulde letters niet zo mooi, maar omdat het een oefenproject is kan ik hier wel mee leven geloof ik 😉

And you’re done! Put in the needles, attach the button and string again, and roll up the leather. Wrap the string around the leather a few times and then around the button, so it will stay in place. And there we have an easy needle organizer which took only a short time to make!

En dat is het! Stop de naalden terug, rijg het touw met de knoop door het leer en rol het op. Wikkel dan het touw een paar keer om het leer en een paar keer om de knoop zodat het blijft zitten. Tadaaa, een hele makkelijke naalden-opbergmap, die je in een hele korte tijd kan maken!

roll it and close

leather needle storage 2

leather needle storage

I think it blends right in with my other accessories on this shelf 😉

Ik vind dat het prima bij de andere spulletjes op deze plank past 😉

nice accessory as well

Happy Crafting this week!!

Veerle ondertekening


Handmade Christmas

Hope you all enjoyed the holidays and have big plans for 2014! On the last day of 2013: a Christmas presents reveal, and for me a little looking back to what has happened last year… And I can tell you, a lot!! It has both been a rough, and a very good year for me…

Although the Christmas days were a bit crowded and stressful, with everyone staying over, I enjoyed them very much (being with family) and we were all spoiled with presents again. For one thing: I guess not many women would be getting jig saws for Christmas, but well, you know me: I couldn’t be happier!

Ik hoop dat jullie fijne feestdagen hebben gehad en vooral grote plannen hebben voor 2014! Op de allerlaatste dag van 2013 wilde ik toch nog even mijn handgemaakte kerstcadeaus laten zien, en in mezelf een klein beetje terugkijken op het afgelopen jaar. Er is een hoop gebeurd, en het was vooral een zwaar maar ook erg goed jaar voor mij.

De kerstdagen waren nogal druk hier in huis met alle logées, en daardoor tamelijk stressvol voor mij… Maar, uiteindelijk was het erg fijn om samen met familie te zijn en we hebben elkaar weer vreselijk verwend met cadeaus. Ik denk niet dat veel vrouwen decoupeerzagen krijgen voor kerst, maar ik dus wel. En ik kon niet blijer zijn!!

Bijna iedereen kreeg een handgemaakt kerstcadeau van me, en hier is een kleine samenvatting van wat ik gemaakt heb:

Here’s a little overview of my handmade Christmas presents:

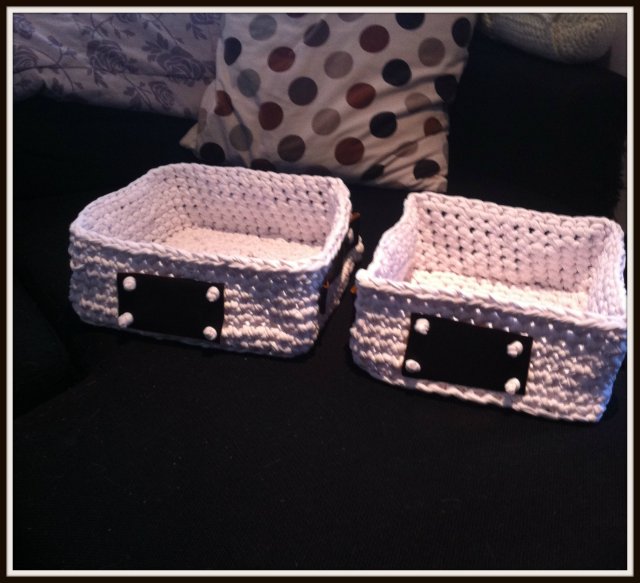
Square crocheted baskets for my mother: Gehaakte opbergmanden van Zpagetti (waar ik drie keer opnieuw aan ben begonnen, dus tja.. ‘oefening baart kunde’ zoals de Belgen zeggen)

crochet square baskets4
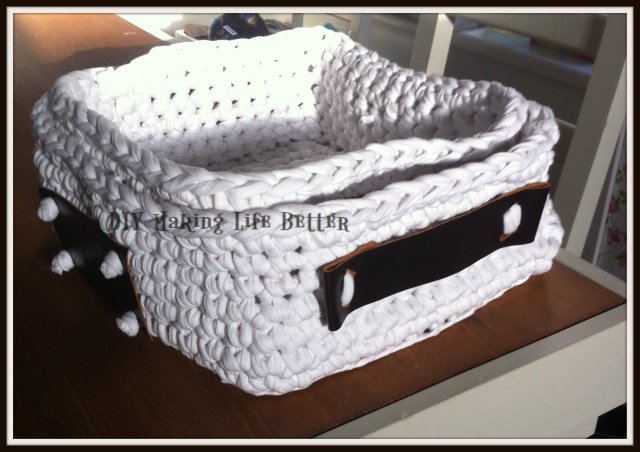
I attached some leather handles and labels to them, because I thought it looked better 🙂 Omdat ik ze kaal en te saai vond, heb ik er leren handvaten en een label opgezet.

crochet baskets square1

crochet square baskets

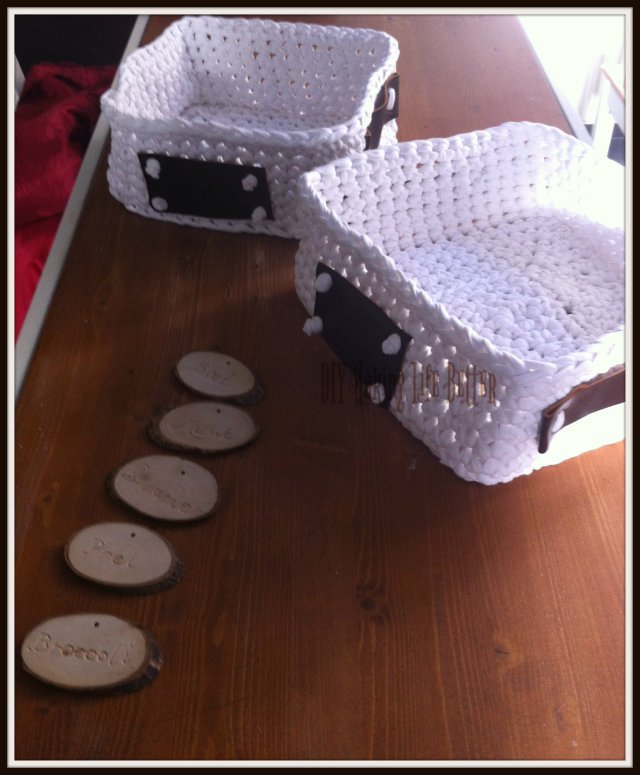
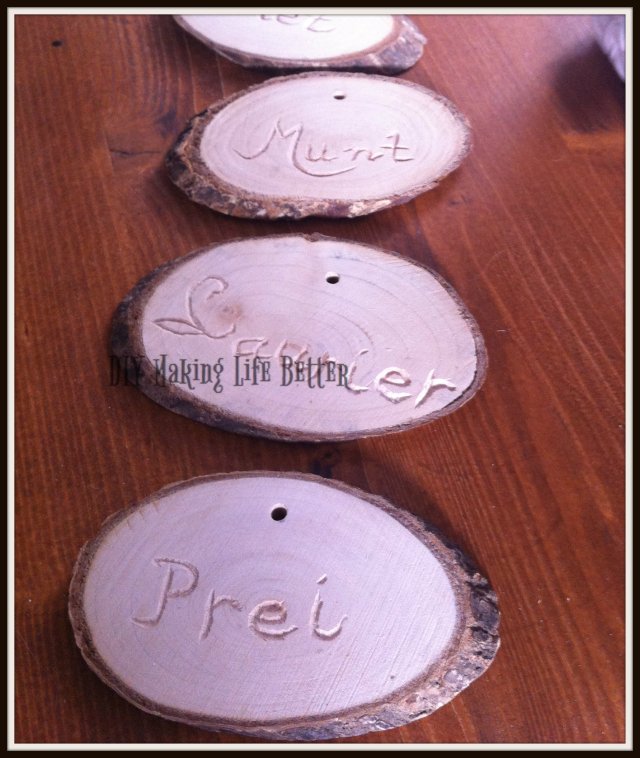
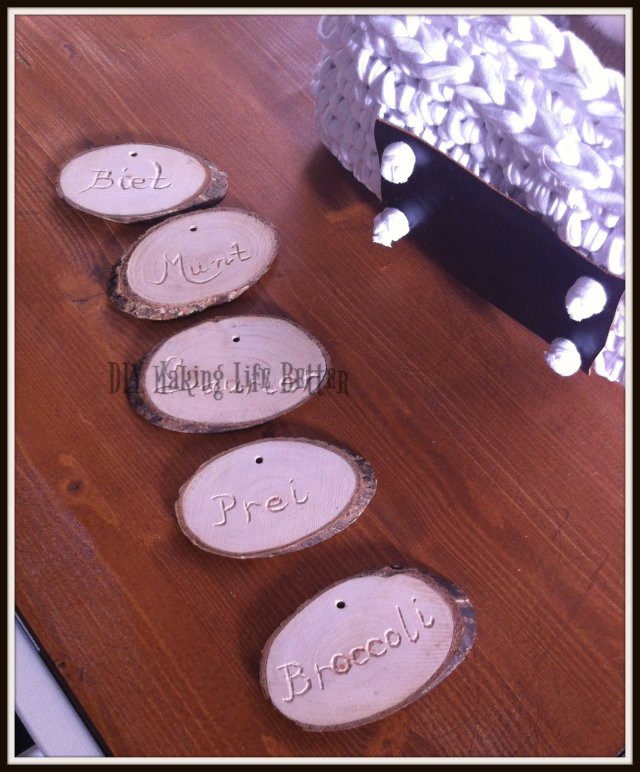
In the picture above (and the ones below) you can see the carved wooden vegetable labels I made for my brother in law. He and my sis want to start growing their own vegetables in the garden, so I made him some labels to go with a gift certificate: her can order some labels later, once he has figured out what to plant 🙂

In de foto hierboven (en die hieronder) zie je de gegraveerde, houten bordjes voor mijn schoonbroer. Mijn zus en hij willen graag wat groenten en kruiden planten in de tuin, dus ik heb deze gemaakt voor bij een tegoedbon: als hij er uit is wat hij wil gaan planten, kan hij een aantal andere bijbestellen 🙂

carved vegetable labels2

carved vegetable labels

Of course I added a few layers of varnish to make them ‘outside-proof’, but stupid me: I didn’t take any ‘after’ pictures…

Ik heb ze een aantal laagjes beits gegeven zodat ze buiten kunnen blijven hangen, maar ik heb stom genoeg geen ‘na-foto’s ‘ gemaakt…

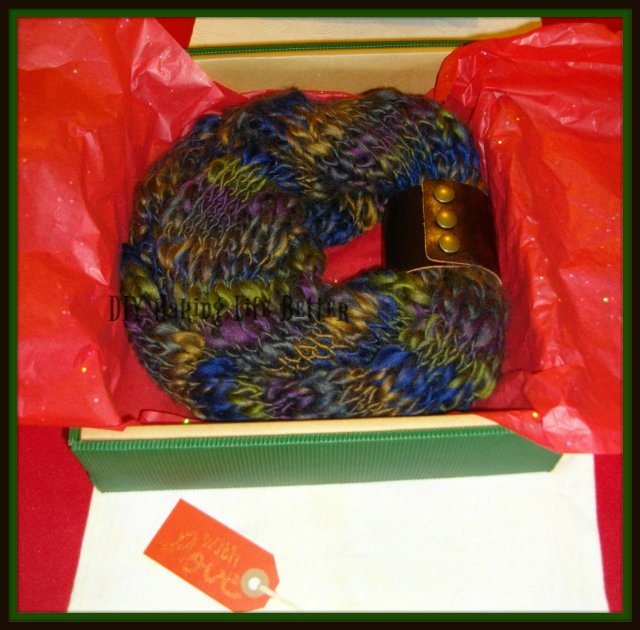
Voor mijn zus heb ik daadwerkelijk een sjaal gebreid! Ik hou dus helemaal niet van breien, waarschijnlijk omdat ik er niet goed in ben (en haken sneller gaat) maar deze wol was zo bijzonder dat ik hem wel moest breien. De draad heeft namelijk een variabele dikte: doordat in sommige steken een stuk dunne draad zit en in sommige steken een stuk dikkere draad, krijg je een heel speels effect bij breien. Maar met haken vallen de dikke en dunne stukken precies samen en zie je er dus niets meer van! Omdat ik ergens een foutje had gemaakt (recht, averecht, ik was de tel kwijt…) en hij op één plek aan elkaar was genaaid (ik heb niet rondgebreid) zat er een lelijke plek in die ik wilde verbergen. Hiervoor heb ik een stuk leer gebruikt met drukknopen. Dit ziet er zo leuk uit dat ik nu zelf ook zo’n sjaal wil!!! De band kan er af, maar ik vind dat het er mooier uit ziet mét…

For my sister I’ve knitted this scarf. I don’t like knitting at all, probably because I am a terrible knitter and because crochet gives a quicker result, but this was such a special yarn that I hád to knit it! The yarn contained thick and thin parts, and by knitting it, the thick parts were joined together just as the thin parts were joined together. You can see that a little bit in the pictures below.. Anyway, it looked really nice! I tried to crochet the yarn at first, but then the ‘special effect’ was missing completely and it looked too boring and messy, so I started over… Of course, I made some mistakes while knitting, ánd I had to stitch it together at some point. To hide the ugly parts, I made a leather cuff. I think it looks awesome and I am totally making one of these for myself as well ;). Besides hiding the mistakes, the leather cuff will keep the scarf from stretching. Also, she can take the leather cuff off at any time, but I think it looks better with the cuff on.

knitted scarf1leather cuff

knitted scarf2

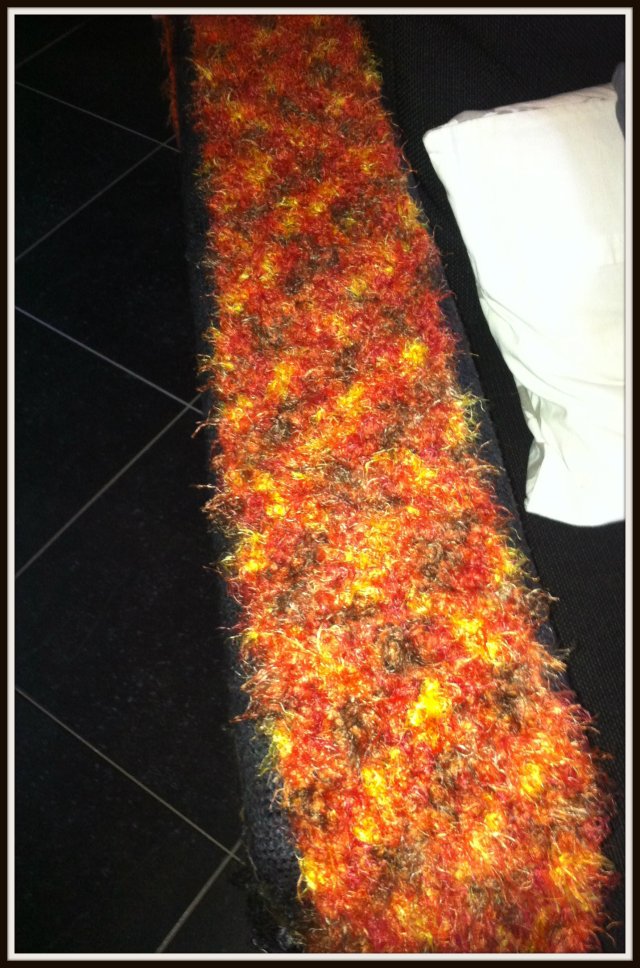
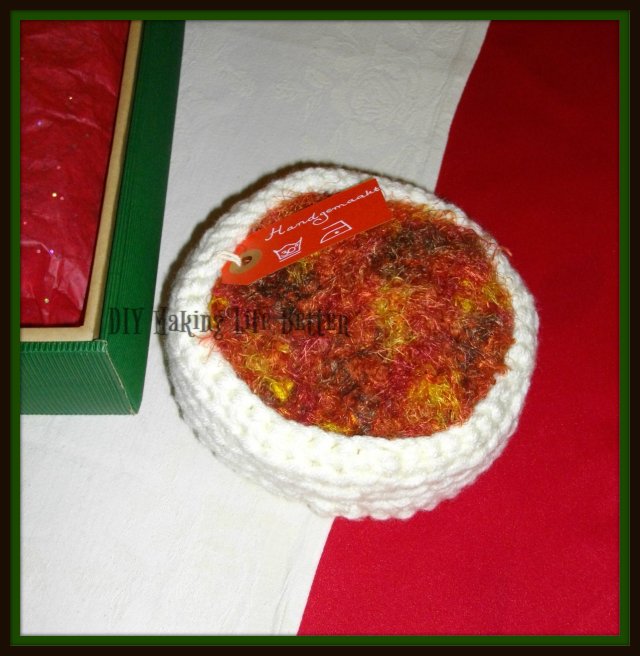
Then, I crocheted another scarf: for my grandmother. Someone told me she would never dare to crochet or knit something for her grandmother, since she would probably do a much worse job than her grandmother would. I took on the challenge anyway, and (luckily) my grandmother liked it very much!! The wool was super soft and fluffy, so you can’t tell it is crochet just by looking at it. It was a bit shorter than I would prefer, but my grandmother usually wears it single-folded, so a larger scarf was (I think) not her taste anyway…

Voor mijn oma heb ik een andere sjaal gehaakt. Iemand zei me dat ze nooit iets zou durven haken of breien voor haar oma omdat ze bang was dat oma het toch vele malen beter zou maken dan zij.. maar ik heb de uitdaging toch maar aangenomen ;). Gelukkig vond mijn oma hem heel leuk! De wol is superzacht en harig en je kan dus helemaal niet zien dat hij gehaakt is. Hij is een beetje kort naar mijn smaak, maar omdat oma haar sjaals volgens mij toch maar één maal omslaat, was een langere sjaal niet helemaal haar smaak geweest denk ik.

crochet scarf sicilia 2

crochet scarf sicilia 3

wrap it

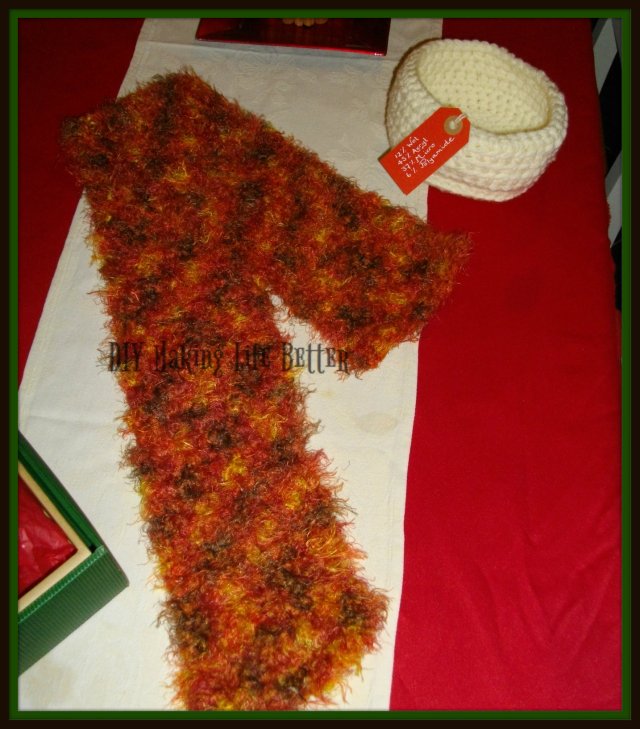
Ik had nog een handgehaakt mandje liggen waar ik de sjaal in gevouwen heb, bij wijze van cadeauverpakking.

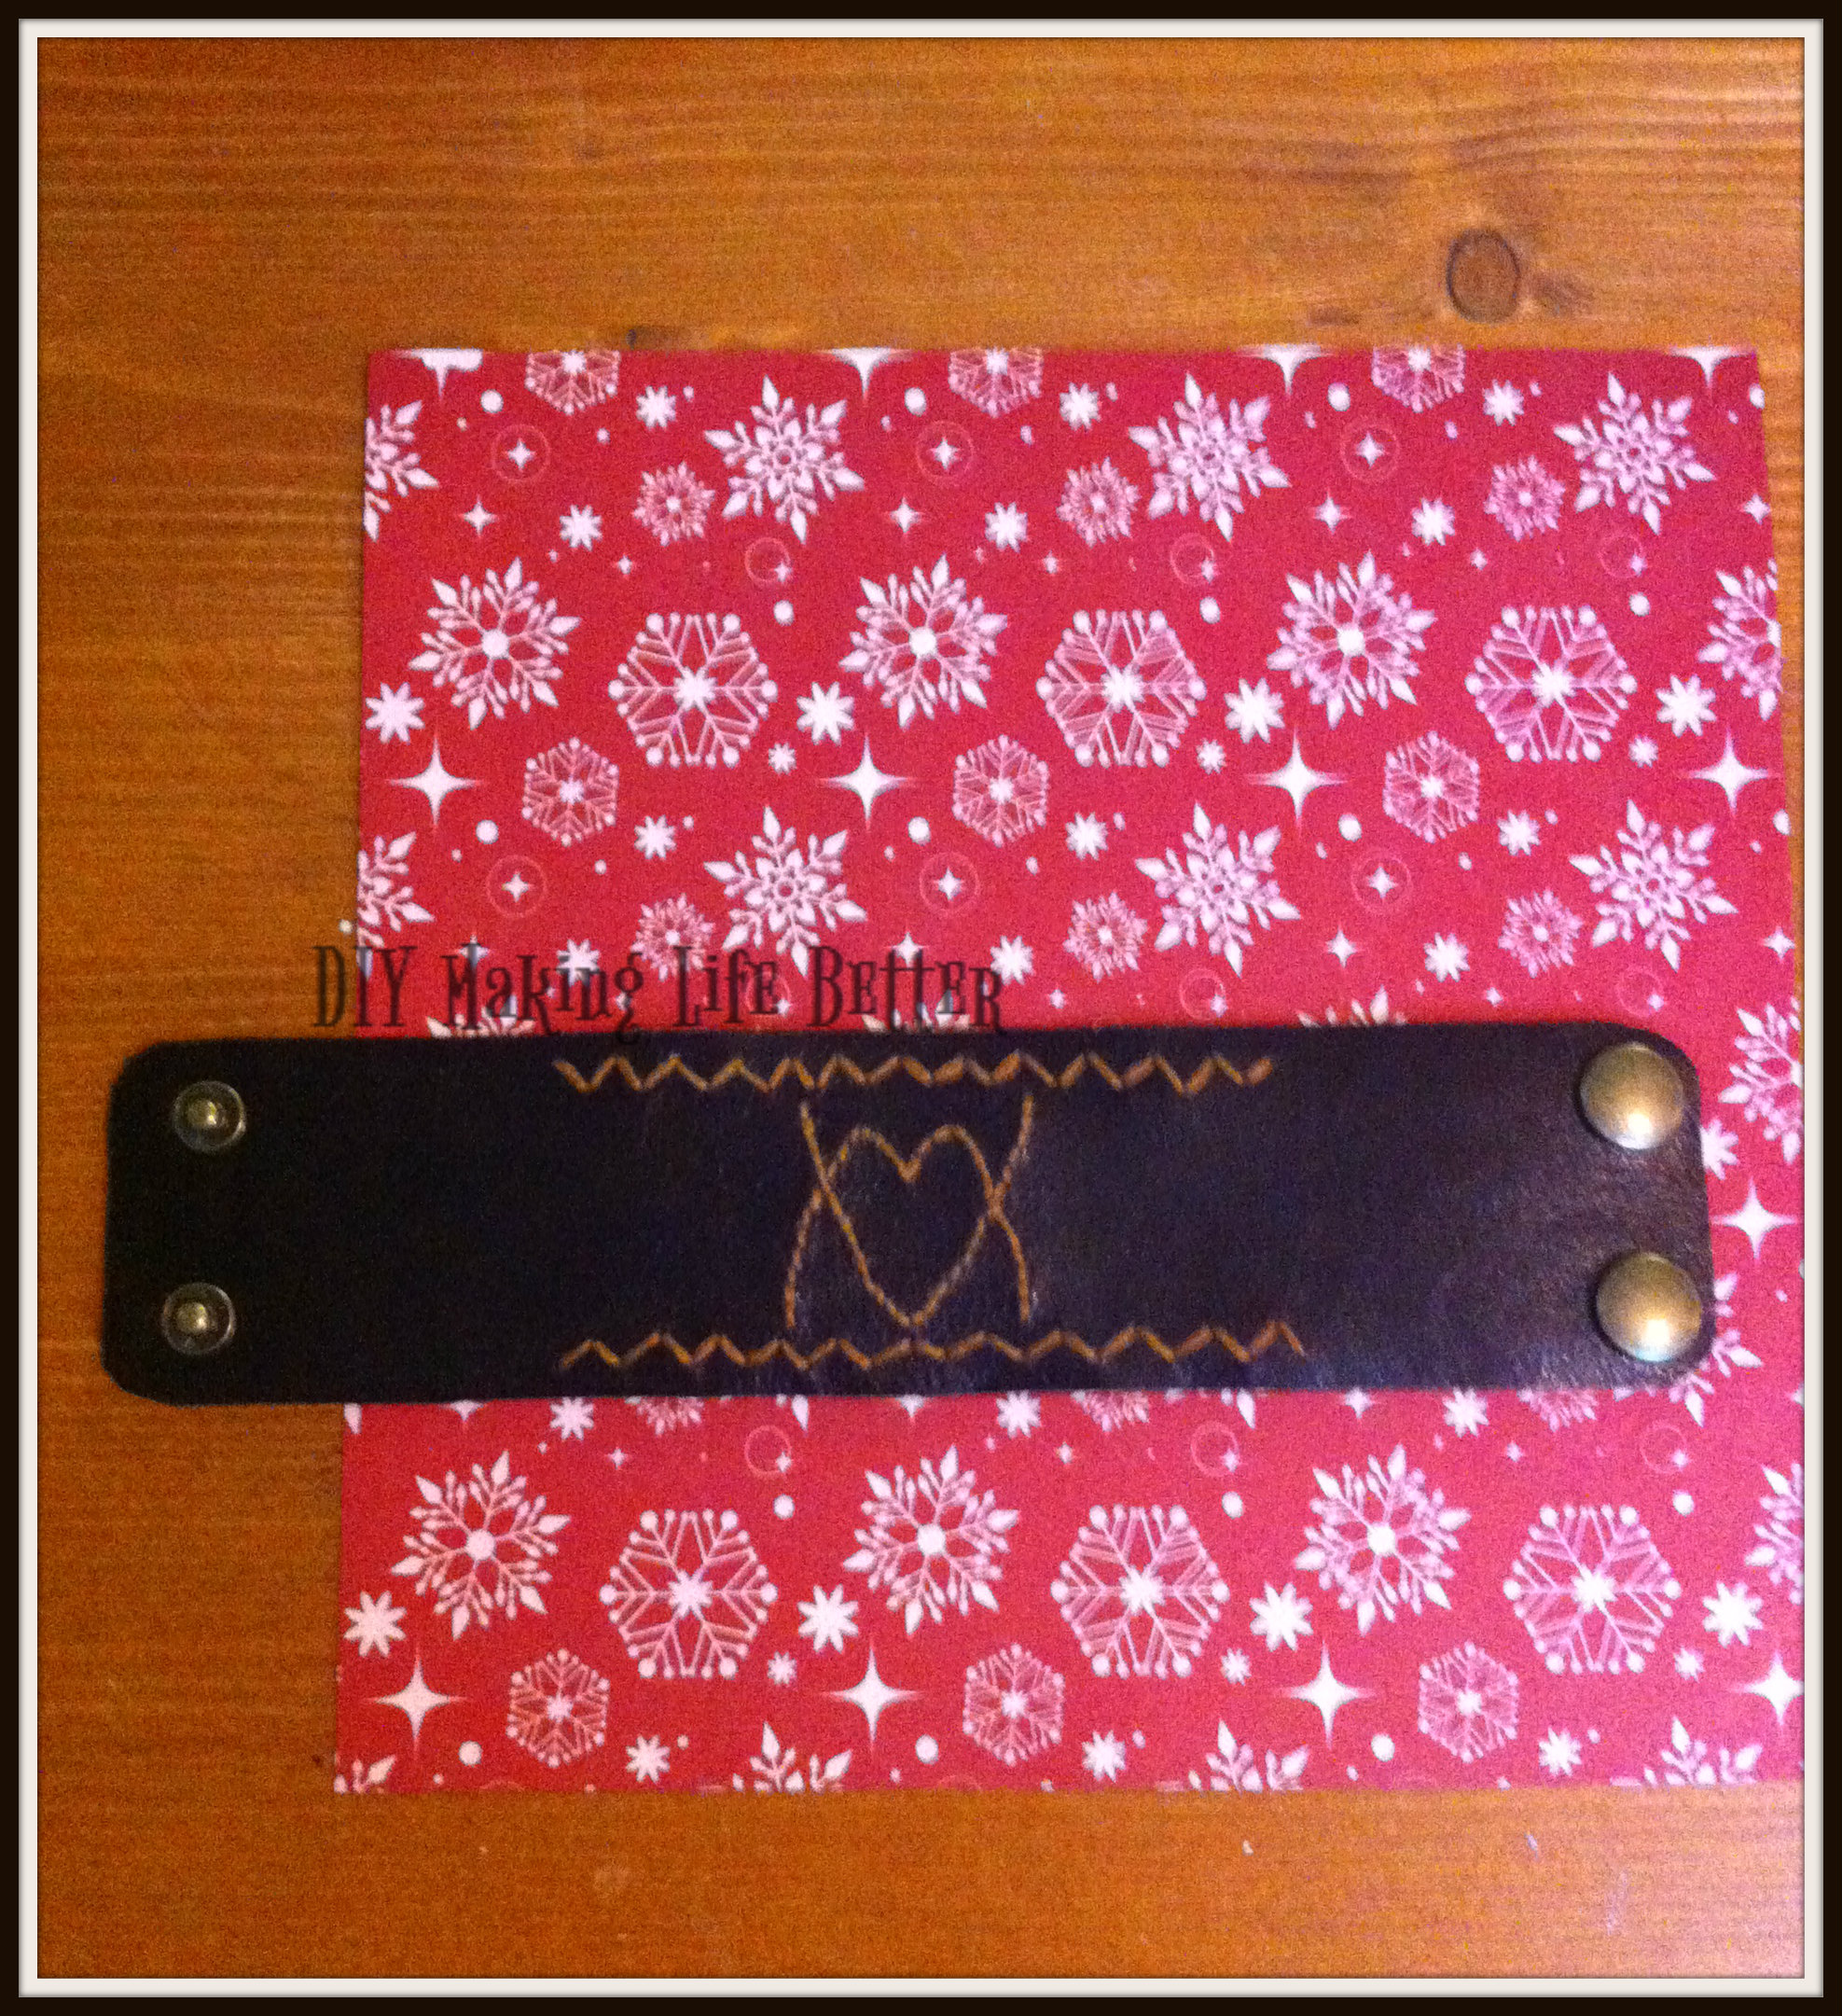
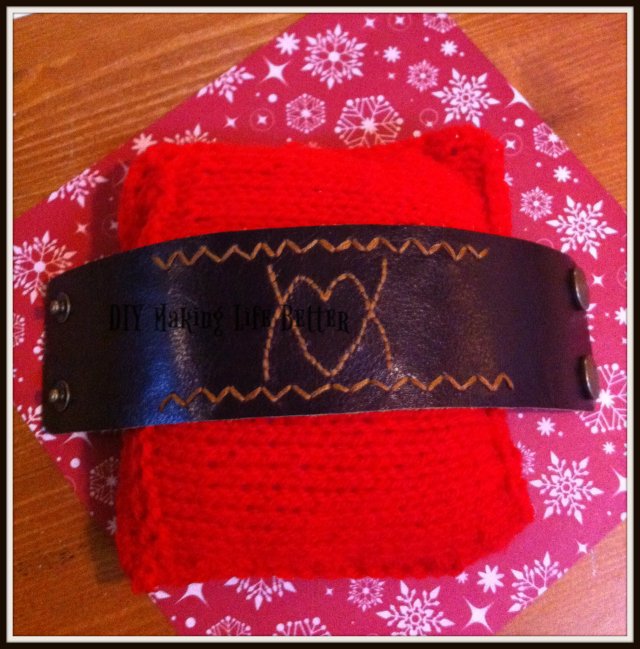
Finally, for my boyfriend I made this embroided leather cuff. I thought of burning the leather at first (since I made my own design) but because of the dark colour of the leather I thought it would look better if I embroided it. My first embroidery job ever, by the way… ;). It’s not perfect (at all) but it’s the idea that counts, right?

En voor mijn vriend heb ik deze geborduurde leren armband gemaakt. Eerst wilde ik het zelfbedachte ontwerp er in branden, maar omdat het leer zo’n donkere kleur heeft zou je dat toch niet kunnen zien en heb ik het geborduurd met DMC garen. Oh, en dit is mijn eerste borduurproject ooit, trouwens… 😉 Niet perfect, maar het gaat om het idee, toch?

embroided leather cuff

embroided leather cuff3

embroided leather cuff2

Since it’s the last day of 2013 I will have come up with some good resolutions for next year quickly! And these pictures just made me think of another one: take better pictures for my blog in 2014!! Please excuse the terrible quality, hope you appreciate them anyway… I will do my best to improve it soon 😉 Also, I will try and write my posts in both English and Dutch, like this one.

Have a very good new year’s eve and be careful with the fireworks 😉 See you all next week!!

Omdat het al bijna 2014 is, moet ik snel nog wat goede voornemens bedenken… Bovenstaande foto’s doen me voornemen om volgend jaar betere foto’s te maken voor mijn blog. Sorry voor de slechte kwaliteit, maar ik hoop dat je ze toch leuk vindt. Ik ga mijn leven beteren 😉 Ook wil ik aankomend jaar de blogs in zowel Engels als Nederlands schrijven, zoals deze…

Fijne jaarwisseling allemaal en voorzichtig met het vuurwerk! Tot volgende week!!!

Veerle ondertekening


Merry Christmas!!

No DIY this week, just want to wish you all a very merry Christmas!!!!

Since all of my recent DIY projects are handmade Christmas gifts, you’ll have to come back later to see some pictures 😉 It would spoil the surprise, you know… my sister and mom are very loyal followers of this blog 🙂

So, for now:

Merry handmade Christmas!!

Enjoy the holidays (I know I will) and see you all very soon!!!


Veerle ondertekening

Home-made Christmas ornaments

It will soon be Christmas. Next week already!! Time flies, and still so much to do… Do I feel a little time-pressure coming up there? Hmmm… Since I’m making my own Christmas gifts besides doing Christmas shopping, planning our dinner, decorating the house and have to work in between, I feel like being way too busy at the moment…. And still, in between all of this planning and preparing, here’s a short update on how to make your own Christmas ornaments at home, which you can of course combine well with store-bought ornaments! And even though store-bought ornaments may look better, crafting should be fun! Now there’s a good enough reason to make your own decorations :).

I’ve made a few ornaments using wooden decorative items I already had, a bit of air-drying clay, acrylic paint, and all my scrap ribbons, rope, buttons, felt and yarn I had lying around. For our DIY-Christmas tree :).

First, pick a colour scheme. I chose red and white, and just a bit of silver and green. I like the ‘traditional’ colours. But you can choose any combination you like, whether it’s bright pink, blue and gold, or plain wood and natural colours…

You could start by making a few clay ornaments, which you can paint and decorate any colour you like once they have dried. I chose the letters spelling ‘Frosty’, a little clay snowman and a pair of mittens:

clay ornaments

Then paint them! Since I didn’t use a primer, it took two or three layers of acrylic paint to get them covered well.

paint clay

Gather all you supplies and combine whatever things you like. For example, I had some felt and ribbon bows, and decided that I wanted to give the letters a belt (like Santas belt) and a cute felt hat. Cut the felt to size a paint on the black belt. Then glue on the felt hats with all-purpose glue and leave them to dry for a while. For the mittens I thought it would look cute to glue on the ribbon bows, and Frosty the snowman was just painted with white, orange (the nose) and black (for the eyes and mouth). To finish it all, I glued buttons on its body 🙂

gather supplies

painted clay

mittens and snowmanFrosty letters

To finish the letters, I glued on a few metal snaps as to represent the buckle on the belt.

When you’re satisfied with the result, either glue on some ribbon or tie a little bakers twine to the ornament to put them in your tree!

glue ribbons

decorated birds

On the pictures above you see four little birds I bought last year but didn’t use so far. I painted them red, added a bit of glitter in mod podge/ Art Medium, glued on some paper wings and used a polymer clay (‘Fimo’) button to represent the eye. I didn’t make any before pictures, but in the pictures of the decorated tree (further below) you can see the results :).

rudolf and pillow

Below the Christmas tree I placed the plaster Rudolf I wrote about last post and a knitted red pillow. Since I don’t really like knitting I crocheted the backside of the pillow ;). I’ve used decorative glitter sand to fill an empty ball and used two wine glasses to hold the candles. Also, since there are no presents under the tree yet, I replaced the real ones with fake presents. Just wrap some empty cartons in Christmas wrappings and put them below the tree until the real presents arrive ;). My cats enjoy these very much, I can tell you that….

By the way, at this moment the plaster of Paris Rudolf has found a new temporary home in the shop window at my work as an example of what you could make with plaster of Paris :).

For everything else: I still had some fake glitter leaves, wooden ornaments and candy canes lying around and combined everything to decorate the tree. Which is, let’s admit it, the best part of it all! Use ribbon and rope to put them in your tree!

Hope you appreciate the pictures of the decorated tree below:

frosty clay ornaments

You can see I gave Frosty the snowman a little crocheted scarf to give it a bit of ‘texture’.

tree decorations mitten and birdAnd the finished clay mittens!

crochet bootsTo make these Santa boots (below is a better picture), I adjusted a pattern for ‘baby booties’ to a smaller size and used acrylic red and white yarn. I stuffed them with polyester filling and hung them with bakers twine.

under the christmas treeAnd there it is all together!

In daylight

In daylight

Later, I decided to add a red cloth to hold all the presents next week, and turn over the wine glasses. Now, we put bigger candles around the tree to add a bit more light 🙂

decorated tree 3

There it is!

On top of our TV unit I placed a bit more Christmas decor (in a large vase) using the left over twigs I used on the tree.

decorated tv unit

Now all there’s left to do for me is to hang more Christmas lights and nicely decorate our dinner table to finish the Christmas look here. Unfortunately we can’t display that many ornaments, for our cats will try and tear it down! Oh, and finish my Christmas presents of course! Can’t wait to display all the presents around the tree 🙂

Happy crafting and preparing for the holidays!!!

See you next time!

Veerle ondertekening


Christmas Ornaments – Rudolf

This time both in English and Dutch, so anyone can understand 🙂

During the last three weeks I’ve been very busy making Christmas decorations. I’ve been wanting to try out some materials, and now want to share some easy ways to create cute Christmas ornaments, of course for our DIY tree!  I guess they’re just as much fun to make for you, as they are to make together with your kids.

For starters, make this Rudolf out of a few simple ingredients:

Deze keer schrijf ik maar zowel Engels als Nederlands, ik denk dat het dan toch het beste te volgen is voor iedereen!

De afgelopen weken ben ik nogal druk in de weer geweest met doe-het-zelf kerstversiering. Ik wilde wat materialen uitproberen om mee te werken en daardoor kan ik nu een paar gemakkelijke manieren laten zien om zelf kerstversieringen te maken. Voor mijn nieuwe doe-het-zelf boom natuurlijk ;). Ik denk dat het net zo leuk is om hiermee bezig te zijn als volwassene, maar natuurlijk zijn ze ook prima samen met de kinderen prima te maken. 

Om te beginnen, kun je  een Rudolf maken met deze eenvoudige benodigdheden:

  • Household gloves Schoonmaakhandschoenen
  • Plaster of Paris (Modelleer)gips
  • A large vase and a large spoon/branch Een grote vaas en een grote (pol)lepel of stok
  • Some acrylic paint Acrylverf
  • Wiggly eyes, a red pompom, some red ribbon and a bell Wiebeloogjes, een rode pompom, rood lint en een belletje.

Start by gathering your supplies and covering the working area with some plastic or paper. Afterwards it is much easier to clean up the mess and you don’t want to get plaster of Paris stuck in your drain!! It might get clogged. So, importantly: just throw away as much as you can once your done, instead of flushing it down the sink.

The volume of Plaster of Paris you’re about to use is heavy, so make sure that, if you hang your glove on a stick or wooden spoon the way I did, it won’t tear by the weight of plaster poured in there. I’ve just taped the edges, to make sure it wouldn’t rip any further, but you could think of other ways to support the glove.

Begin met alles klaar te zetten en dek je werkplek af met plastic of kranten of zo. Als je klaar bent is het zo veel gemakkelijker opruimen en je wil geen (of zo min mogelijk) gips in de afvoer krijgen. Die kan hierdoor namelijk verstopt raken! Dus, heel belangrijk: gooi zoveel mogelijk in de prullenbak na afloop, in plaats van het onder de kraan af te spoelen!

Omdat je best veel gips gaat gebruiken is dit vrij zwaar. Zorg er dus voor dat de handschoen niet uitscheurt op de plek waar je de stok/lepel doorheen steekt, zoals ik heb gedaan. Ik heb gewoon wat extra plakband om de rand gedaan zodat de gaten niet zouden uitscheuren, maar je kunt natuurlijk andere manieren bedenken om de handschoen te ondersteunen.

plaster in glove

Once everything is prepared, you can start mixing the plaster of Paris. According to the manufacturer I had to add, in my opinion, very little water. Since I wanted to pour the plaster, I’ve added more water to get a more ‘liquid’ mixture. It will dry fairly quickly, so make sure to pour it in the glove soon after you’ve made the mixture. While the plaster is hardening it will get warm; this is normal ;). It will be solid after an hour or two… You can remove the glove now. However, the shape will remain to feel a bit moist for two more days, so leave it to dry for a few days before painting it!

Als je alles hebt klaargezet kun je de gips gaan mengen met water. Volgens de beschrijving moest ik wel erg weinig water toevoegen, vond ik. Omdat ik de gips wilde gieten heb ik méér water toegevoegd dan op de verpakking stond, zodat het mengsel vloeibaarder werd. Gips droogt vrij snel, dus giet het meteen na het mixen in de handschoen. Terwijl de gips uithardt wordt het warm, dit is normaal ;). Na een uur of twee is het ongeveer hard en kun je de handschoen eraf halen. Let op: de vorm zal nog een dag of twee vochtig aanvoelen, dus laat het nog 48 uur goed drogen voordat je het gaat schilderen!

drying plaster

strip off glove

I’ve left the shape to dry for a few more days and once it had dried, I sanded it a bit. In the picture below, you can still see the structure of the household glove after removing it; you don’t want that, do you? Then start painting it. I chose a brown base colour, but you could pick any fun colour you like for Rudolf’s furry head.

Ik heb de vorm een paar dagen laten drogen en heb hem toen een beetje bijgeschuurd. In de foto hier onder zie je de textuur van de handschoen na het verwijderen, wat je natuurlijk niet wil blijven zien. Dan kun je gaan schilderen. Voor de basis heb ik bruin gekozen, maar je kunt elke vrolijke kleur kiezen die je wil voor Rudolfs hoofd.

sand it a bit

paint plaster

Leave the base paint to dry very well! I know that acrylic paint dries fairly quickly, but in this case the plaster may still be a bit moist and it will take a bit longer for the paint to dry than you’re used to. Make sure the paint has completely dried before painting Rudolf’s nose and ears…. It may be even better to use a gesso (primer) before painting it, I guess. I didn’t… you know me by now…

Laat de verf goed drogen! Normaal gesproken droogt acrylverf vrij snel, maar in dit geval kan de gips nog vochtig zijn en zal het langer duren dan normaal, voordat de verf droog is. Zorg dus dat hij echt goed droog is voordat je de neus en oren gaat schilderen. Ik denk dat het nog beter zou zijn om eerst, vóór het schilderen, een gesso aan te brengen. Dat heb ik niet gedaan…jullie kennen me nu ondertussen wel…

Use a light brown to paint the shape of the nose and ears. I thought it looked better to trace the outline of the nose and ears with a black porcelain-pen. However, you may use a small brush and black paint as well. Or a Posca painting pen. As long as it doesn’t scratch the surface: plaster of Paris is very easily scratched.

Gebruik licht-bruine verf voor de neus en oren. Ik vond dat het er beter uitzag als ik de omtrek zou aftekenen met een porseleinstift. Je kan ook gewoon zwarte verf en een dun penseeltje gebruiken. Of een Posca-stift. Zolang het maar geen krassen maakt in het gips: dit gebeurt vrij gemakkelijk.

Then, take an all-purpose glue and glue on the wiggly eyes and the pompom nose! Tie the red ribbon with a bell around Rudolf’s neck, and you’re all set!

Gebruik vervolgens een alles-lijm om de wiebeloogjes en de pompom neus op te plakken. Strik een rood lint met het belletje om Rudolfs nek, en klaar is kees!

rudolf

I’ve used some white paint on Rudolf’s antlers, just to add some fun details. What do you think? Easy and very fun to make!!

Ik heb met witte verf nog wat leuke details op Rudolfs gewei geschilderd. Wat vinden jullie er van? Gemakkelijk en heel erg leuk om te maken!

Happy Decorating! Veel plezier met versieren!

Veerle ondertekening